What is BI Publisher(BIP)?
BI Publisher is a sub tool of OBIEE. It will be installed as a part of OBIEE. The link used for accessing BI Publisher is http://<hostname>:<portname>/xmlpserver
For example http://localhost:9704/xmlpserver
BI Publisher vs OBIEE!!
BI Publisher is the pixel perfect reporting solution within OBIEE. Presentation Services (Answers) is the analytical solution with in OBIEE.
BI Publisher is a simpler tool compared to the OBIEE answers. BI Publisher is used for reporting.Answers is used for analysis.
We can create the reports quickly using BI Publisher by directly writing queries against the database. Whereas in OBIEE answers we have an underlying RPD and it takes a lot of time and effort creating reports.
It is easier to query against the ODS using BI Publisher.
Discussion on this topic can be found in the below link :
https://forums.oracle.com/forums/thread.jspa?threadID=676773
In my present project we are using BI Publisher in the initial phase of the project. Later we will be developing the same reports using OBIEE.
The steps to be followed for developing the BIP reports are:
1.Configure the Data Source
We have to mention the data source details. This is done using Administration section.
2.Develop the Data Model
You can either use the Query Builder utility or directly paste the complete SQL of the report to be generated for developing the data model.
3.Create the report
In this step we can just drag and drop the columns into a Table,Chart or other similar layouts.
NOTE: BI Publisher has a limitation that we won't be able to add more than 5 or 6 columns in the table view.
In this case we have to develop a RTF template which contains the table structure.We will then import this RTF template to BIP and create the report. The RTF template is just a Word document saved in .rtf format. This document will have the table structure and xml code written in this.
1. Configuring the Data Sources
Types of Supported Data Sources
Oracle BI Publisher supports various types of Data Sources such as JDBC data sources (Oracle Database, and other Databases), XML Files, BI EE Reports (Answers), JNDI data sources, OLAP data sources, Fusion Application Data sources, Web Services, HTTP data sources, and Discoverer.
Before you create a data model based on these data sources, you need to configure a connection to these data sources first. In this topic, you will learn how to configure a JDBC connection to an Oracle Database.
Defining a JDBC Connection
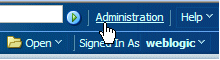
1. To define a JDBC connection click the Administration link found on the right side of the BI Publisher page.
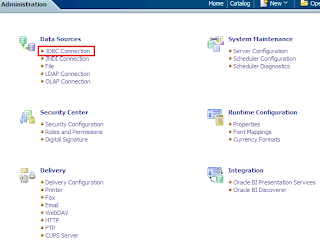
This displays the BI Publisher Administration page as shown below .Click the JDBC Connection link found under the Data Sources section in the Administration page.
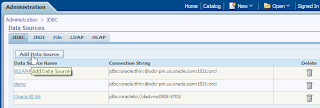
2. This displays the Data Sources page. In the JDBC section, click Add Data Source to create a JDBC connection to your database.
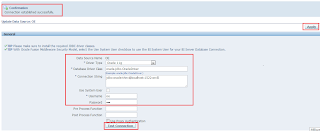
3. In the Add Data Source page that is displayed, enter the details as given below -
Data Source Name - OE
Driver Type - Select a driver type to suit your Database (for example, you can select Oracle 10g or Oracle 11g to suit your Database).
Database Driver Class - oracle.jdbc.driver.OracleDriver (Define a driver class to suit your Database)
Connection String - Provide the database connection details. For example hostname:port:sid.
User name - OE (Database user name)
Password - OE (Database user password)
Do not click Apply or Cancel after defining the above details. Click Test Connection.
If the connection to the database is established, a confirmation message is displayed indicating the success.
Then click Apply.
Note: To continue with this tutorial exercises, the sample schemas OE should be installed in your Oracle Database . Else, you will not be able to define this JDBC connection
4 . You can see this newly defined connection (OE) in the list of JDBC Data Sources.
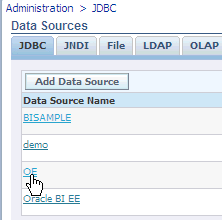
Note: You can also set up the the default connection demo to point to OE schema in your database, as the samples use this connection. Then the demo connection can be used as the default data source for this tutorial too.
2. Developing the Data Model
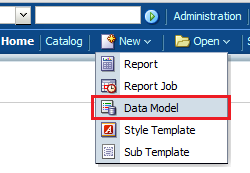
1. To define a Data Model click the Data Model as shown below.
2. Select the data source in the data model.

3. From the Data Set drop-down menu, select SQL query as the type of data set.

4. In the Create Data set -SQL dialog box that appears, enter an appropriate name for the data set, accept the default data set option (as you have already defined it in the Data Model), and click Query Builder to create a query. When it comes to complex queries it will be difficult to create it using the query builder.
The other option is to create the query manually in SQL Developer and paste the query here.

5.The next step is to view the XML Output and Saving the Sample Data

To save this as sample data, click the Open Menu drop-down list icon, and select Save as Sample Data.

Note: It is very important to save sample data for a data model, else when creating Layouts, the previews do not appear correctly.
You can select various values (multiple/ single) for Department to see the data. You can also restrict the number of rows that you want to see.
3. Creating the report
I will be explaining 3 methods of creating a report. First method is to directly create the report. Second method is by using the RTF template Add-in feature of BIP. Third method is by importing the RTF template.
Refer the below link for knowing steps to be followed for creating the report directly :
http://st-curriculum.oracle.com/obe/fmw/bi/bip/bip11g/gettingstarted/gettingstarted.htm
We won't be able to create a report with more than 5 or 6 columns using the above(first) method. Hence the third method of creating report by importing the RTF template is used frequently. You can follow the second method for creating the RTF template in a simpler way.
I will be discussing the third method here.
We need to create a RTF template containing the report layout. Follow the steps below for this:
Steps to create the RTF template
Open a Word Document .Create the table structure necessary for the report.

Create the table structure shown below in word.

Also enter the code shown below for getting the columns values

Note that G_1 is the element tag name(see the image below). Also note that we have inserted the tag <?for-each:group element tag name?>
before the first column value and <?end for-each?> in the last column.
Reference:
http://docs.oracle.com/cd/E10091_01/doc/bip.1013/b40017/T421739T481157.htm

Save the word document in rtf format as shown.

Now that we have created the template follow the steps below for creating the report.
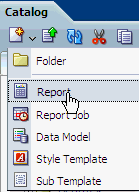
1. Click New (found at the top left corner of page) to see the drop-down menu and click Report to create a new report.
2. Select the data model on which the report should be built and click Open.

3. Click on upload as shown below.

4. The screen shown below will appear. Here we need to enter the layout name. Also browse the word document(saved in rtf format) you have created.For the steps to create the RTF template which can be used as the template file see above . Enter the other fields as shown below.

7. The template will be uploaded as shown below.

8. Click the Save icon found on the top right corner to save this layout.
Enter Salary as the name of the layout, and click Save.

9.Now click Save and save the report.

10. Click on view report.

11. You will be able to see the report as shown below.

You can explore more possibilities. For example you can create an RTF template with your company logo , report name and date as shown below.
Later this template can be used to develop reports by importing it to BIP.

Hope u guys had a happy time implementing this. If you have any queries feel free to post it here.
Bye.... :)
Naveen
Thanks! was really useful!
ReplyDeleteMaster, I have a question:
ReplyDeleteFirst, I need to clarify that I'm a noob on BIP.
I noticed that when I create a report using a rtf template, I can not edit the report into BIP editor. Instead of open the editor, BIP downloads the rtf template to edit it once again on word.
My question is: If I chose to use rtf templates I must accept that I will can not use the BIP editor to modify it?
Yes...You need to edit the downloaded report in word and then upload it again.You cannot use BIP editor in this case.
DeleteThanks my friend...really helpful
ReplyDeleteHi need one help...
ReplyDeleteI have two separate data sources...one is Audit (for OAM) another is auditOIF(for OIF)...Now the default reports in OAM and OIF under shared folders in BIP have one output columns 'View Details' (in each row) clicking on which it redirects to All Events report of Common reports under Oracle fusion Middleware (this is default settings).
But the All Events report can read from only one data source at a time (either from audit or from audit OIF) which results in either the view details link of OAM reports are working or OIF reports are working... But I need to make both of them working at a time.
Is there any resolution on this.
Can I change the view details link to point to some other report somehow.
Any help will be appreciated.
hello,
ReplyDeletehow can we pass a paramter into RTF. so that the report filter.
ex:- as_of_date filter
how to pass parameter into RTF template & filter the report data.
ReplyDeleteex; as_of_date filter
Nice document for beginners
ReplyDeleteNice Work, In case you need any file converter then use this one;
ReplyDeleteConverter Files
That will help you to transfer your file into another;
ReplyDeleteRtf to Html
Vob to Mov
Avi to mpeg
Png to Tga
Mkv to Apk